Updating Quick Sale Buttons and Pages for F & B screen
Overview of updating Quick Sale buttons and Pages for F&B
You can edit, delete, move Quick Sale buttons (QSB) after they have been created. The steps for editing and deleting QSB for the Sales screen and F&B in POS Express are very similar however you should follow the steps for each type.
Note: As of the 3.100 release, you can import your F&B QSB in Online Options. So if you made a change for your F&B module's buttons, you can easily import that change into Online Options and then push that to your iPad's running CPS Air. To see how to import your F&B QSB, go here>>
To navigate to the F&B Quick Sale Button Setup screen
-
Open the F&B module. The Table View displays.
-
At the bottom of the screen select the Settings button. A panel displays to the left.
-
Select Quick Sale Button Setup under Order. The screen displays where you work with the buttons.

From top to bottom of the QSB setup page, you can update:
You can do other things like sorting, restoring, setting a default page and adding modifiers to food and other things while editing.
The Pages section
Page Layout
You can move or delete or change the appearance of a Page button after it has been created. At the top of the F&B QSB screen are the Top Level buttons used to edit the Page (or Category) buttons:

Page Navigation
The buttons to the right of those buttons are used to move you through the category buttons so that you can edit those buttons. These buttons are used drill back up from category or page buttons that you created at the top of this screen:
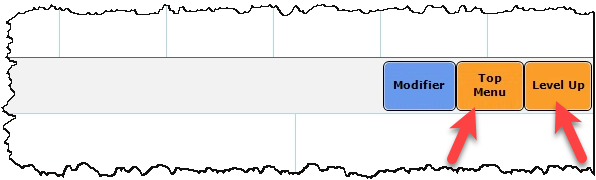
-
Top Menu - used to jump to the top level or starting place in one click.
-
Level Up - takes you back up one level at a time as it is clicked.
Note: The Modifier button is covered here>>
To change the appearance of a Page button
-
Select the Page button to edit, then select the Edit Page button. The Quick Sale Page Set up pop-up displays.
-
Use the pop-up toolbox to [change the appearance] of the Page button.
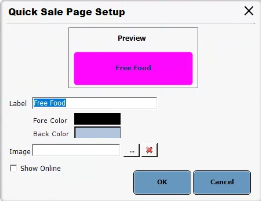
For more details, click here>
Note: You cannot have both an image and a label/color. But you can have an image that contains a text label on it to get around this. Also, go easy on adding images to your buttons, they can be misleading due to the size.
-
Exit out of F&B completely by selecting Back, Exit and then Exit again before the changes take place. A confirmation prompt appears asking if you are sure you want to exit F&B.
Note: If you have created a button for a page with no associated products, that button will not display in the F&B sales screen. You must either add a product to that button or make it a Child button in order for this to be a working button that appears in F&B. To add a product to a button, click the button and click Add. The product fields display.
-
Select Yes. Now you can go back into F&B and see the changes.
Tip: If you need to restore your buttons as they were before you exited the F&B module, go back and into F&B and click the Restore Quick Sale Buttons button. A pop-up dialog displays with a timestamp listed. Use the drop-down button to select a timestamp from a previous editing session, or use the most current one which is listed. Then click Restore. The buttons from that selected timestamp period display.
Note: You cannot edit a page for the Sales screen, as you do here for F&B. The QSB editor for the Sales screen only has four pages at the top and you start creating buttons for them under one of those four pages; they do not have labels/names or any formatting options. See the Editing the QSB Sales screen buttons topic.
To move Page buttons (category) for the F&B module
You can move a Page button after it has been created as follows:
-
In the Quick Sale Button Setup screen, at the top of the screen where the Page button section is located, select the Page button to move. The Move button highlights.
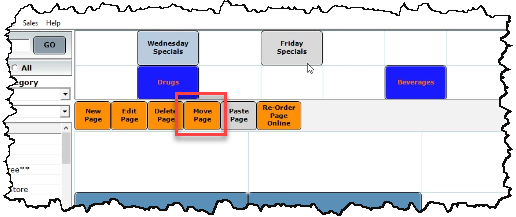
-
Do one of the following to move the button:
-
Select the Move Page button.
-OR-
-
Right-click the Page button, then select Move Page from the pop-up menu.
-
Click the space you want to move, and select the Paste Page button OR right-click that space, and select Paste Page.
To delete Page buttons (category) for the F&B module
You can delete a Page button if it is no longer needed as follows:
WARNING: If you have Child buttons and buttons under this Page, they will all be deleted. Remember to click Save often so if a mistake happens, you can use the Restore Quick Buttons to undo any mistakes.
-
In the Quick Sale Button Setup screen, at the top of the screen where the Page button section is located, select the Page button to move. The Delete Page button highlights.
-
Do one of the following to delete the button:
-
Select the Delete Page button.
-OR-
Right-click the Page button and select Delete Page from the pop-up menu.
A confirmation pop-up box displays.
-
Select Yes if you are sure you want to remove this Page and all the buttons located beneath this page
Note: If you accidentally deleted a button and selected Save, use the Restore Quick Buttons. See below for help.
The Button section
Navigate to the button section
-
Select the button to edit located in the middle of the screen; however, if your button is located under a Page button, select the Page button first then select the Add Child button, then select the button to edit. The button hightlights.
To change the appearance of a button in the F&B module
You can update the button by using the options in the middle of the screen:

-
Add Child - You can update a Child button, or turn a button into a category (like the Page) button that contains other buttons below it by selecting a button then click Add Child.
-
Move/Paste - You can move buttons in different spots on your screen using these two options together.
-
Delete - You can remove a button that is not longer needed.
-
Use the toolbox at the bottom of the screen to [change the appearance] of the button.

-
For a quick pop-up explanation, hover over each button in the image above.
-
For the written details, click here>
-
To update a child button containing other buttons in the F&B module
After you have made a button that acts as category button with other buttons below it, you may need to update it.
Note: While editing or creating a child button and the sub-level buttons, if you decide to leave the level you are on by using the Back button, when you return to the Quick Sale Button Setting Setup screen, you'll be back at that level where you left off. Use the Top Menu and Level Up buttons to get back to the "home" screen or first level.
Note: If the button has a product attached to it, it cannot become a Child button; it might be best to start with a new button or remove the product and then proceed. You cannot change a button into a child button [[[even if it does not have a product attached to it.]]] And you cannot change a child button into a button.
Do the following to update a Child button
-
Navigate to the button:
-
If the button is a child of a child and so on, you must select the child button then click the Add Child (even tho you are not adding a child button at this time). The next level below that child button displays.
-
Repeat this for as many levels down you need to go.
-
Once you have found the button to change, you can do the following:
- Add Child - You can update a Child button, or turn a button into a category (like the Page) button that contains other buttons below it by selecting a button then click Add Child. A blank screen of cells display. Repeat adding buttons or more Child button that has more sub-category buttons (or child buttons) below it, and so on.
- Move/Paste - You can move buttons in different spots on your screen using these two options together. For more details, jump here>>
- Delete - You can remove a button that is not longer needed. For more details, jump here>>
- Use the toolbox at the bottom of the screen to [change the appearance] of the button. For more details, click here>
Note: If you change the button by adding an image, the label on this child button will disappear. You cannot have a label and an image on a button at the same time.
-
Select Save after each button update.
-
Select Back and Exit when you are done.
To change the appearance of both buttons and Page buttons, do the following:
-
Label - Change he name by typing over the current name in the Label field;
-
Fore Color - Change the color of the label's text;
-
Back Color - Change the background color of the button;
-
Font - select a font from the Font drop-down field. Note: The default is Tahoma;
-
Font Size - enter a text size or select a number in the Font size field;
-
Image - click the ellipsis button [...] to the right of the Image field and select an picture for the button from your computer's hard drive.
Note: If you change the button by adding an image, the label on this child button will disappear. You cannot have a label and an image on a button at the same time.
Editing the products associated with the QSB
-
If you know the product code, enter it into the Product Code cell. When the product displays below the cell, double-click it.
--OR--
-
If you know the name of the product, enter it into the Product Description cell. When the product displays below the cell, double-click it.